COO
Before & After! Several examples of retouching photos
How can you make beautiful photos even more beautiful? Simply by retouching photos and perfecting imperfections. Everything is possible. Retouching or styling photos is therefore also a very broad concept and because of this also reflected in every sector where photos are used as commercial goods.
We will not discuss the basic steps for e-commerce image editing. Things like; consistently removing backgrounds, adjusting dimensions, and correcting alignments are still the most important applications for a successful e-commerce policy. However, if we go a step further and let your photos really shine, we usually talk about photo retouching instead of photo editing. In essence, editing or retouching are one and the same.
In this article, some specific examples are given but the list of what’s possible is endless. At the very least, it should become clear why photo retouching can mean enormous added value for your product images. Staying one step ahead of the competition when it comes down to visual content through photo retouching, is the main idea of this story.
Why retouch photos or product photos?
This question has already been answered briefly above. Make beautiful photos even more beautiful! But what does this mean? Let’s start with some descriptive examples.
Imagine, you are an amazing photographer and you are able to shoot the perfect product photo. A perfect product photo does not mean a perfect product. Actually, products are never perfect. Dust, scratches, burrs, or other imperfections that you could not even see with the naked eye are always present. Worse still, a certain product edge can also be skewed or there is a certain dent present that you cannot get rid of.
Another example, shooting glassware, resulting in certain inevitable reflections. Of course, as a photographer, you will always avoid reflection as much as possible with the perfect studio set up and all possible anti-reflection tools. Even so, with the perfect studio setup, it is often unavoidable that reflections or hotspots will influence your result.
We can continue for a while, almost endlessly, describing various examples in which photo retouching is necessary during the post-processing phase. Even with perfect photography, certain photo manipulations cannot be avoided if you want your image to shine on all levels – even exceeding the level of the product design itself. These manipulations, whatever they are, can be dropped in the category of retouching images. So yes, all quite vague but very important when it comes down to convincing your customers to buy the products at your store.
What we have done is simple or maybe even better? We tried to make this vague concept more clear or at least obvious to visualize. For this, we created some basic visual examples, four in total. Always showing you the photo before and after the retouching phase.
For the visualization, we will be using our slider. Moving the slider to the right, shows you the non-retouched photo. Moving the slider to the left, shows you the retouched photo. Simple right!
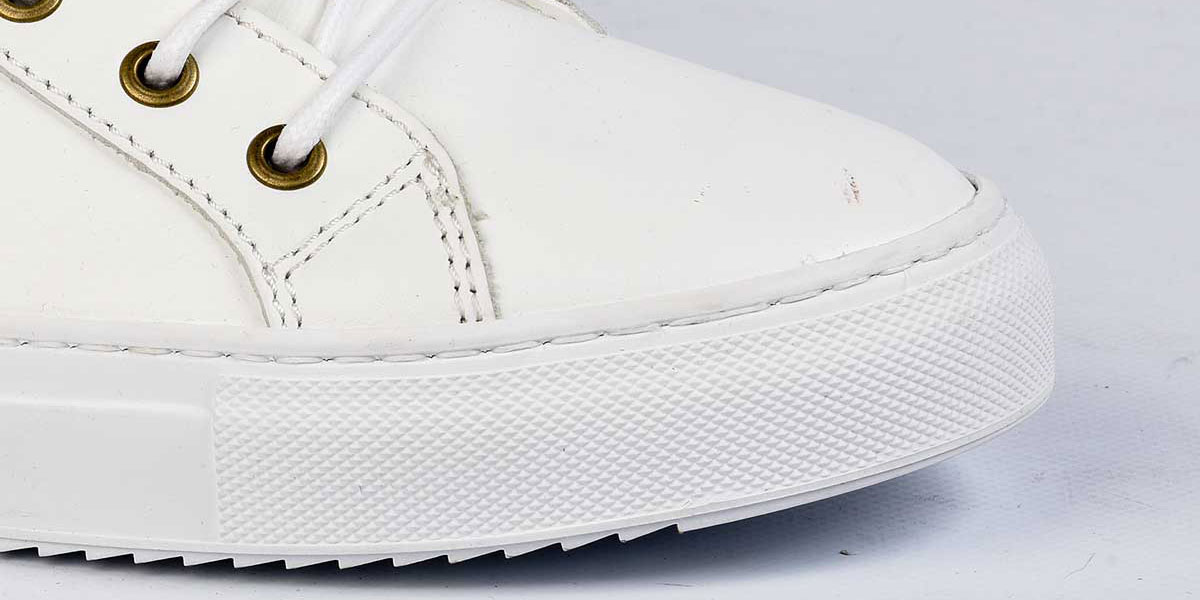
Example 1: Retouching shoes
Not specifically for shoes but rather generally applicable. You can strip every product photo of all imperfections or distraction. In this example, we have retouched the rubber, the leather, and the shoelace from dust, dirt, and other impurities that distract your customers when they zoom in on the image.


Move the slider all the way to the left and the retouched photo will appear. Both rubber, leather and shoelaces were retouched with a noticeable difference. In addition, the photo background is removed, and the natural shadow optimized.
Example 2: Flat clothing photography retouching
Continuing by example, flat clothing photography. There are many ways to retouch clothing. In addition to the obvious photo editing steps; such as removing the background image, aligning, cropping and applying consistent margins, there is an even much larger set of image processing methods available to achieve perfection and consistency.
For example, invisible mannequin (also called ghost mannequin) techniques, smoothing out wrinkles, applying symmetry, removing labels or tags, manipulating hip or shoulder circumferences and much, much more.
What is invisible (or ghost) mannequin?
Read the introduction to invisible mannequin here and learn more about what this technique can mean for your online clothing collection.
Retouching a clothing collection requires a lot of attention, and as always, consistency is very important with e-commerce in mind.
Below, we provide a simple example for flat clothing photography. The product photo, where a clothes hanger was used for photographing the entire collection, is simply removed and the missing part is retouched, as if the clothes hanger was never present.


The garment is stripped of the hanger for the same reason as the retouched shoe. Every distraction must be avoided to guarantee a good customer conversion rate for your online store.
It goes without saying, that in addition to consistency, for the photo background, size, margin and alignment, tools such as labels, pins and needles must all be removed and retouched before the product photo can be successfully published online.
Example 3: Retouching jewelry
For jewelry, in this example a ring, presentation is of course everything. Presenting expensive objects or luxury items where defects immediately catch the eye is obviously unacceptable.
In addition, a ring is a relatively small object that of course must be captured with high resolution. Some defects, not immediately visible to the naked eye, suddenly become very clear on the photo. Hence, post-processing or retouching cannot be avoided.
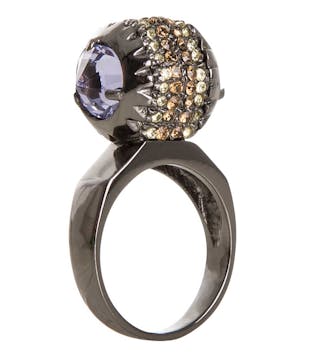
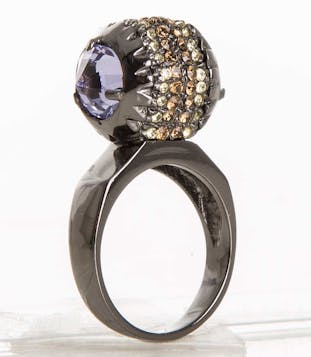
Also, jewelry usually need to be fixed in space in some smart way before you can even take a shot. Here, a small piece of clay is attached to the bottom of the ring to allow the product to stand upright during shooting. This piece of clay must of course be removed and then the missing part must be reconstructed or retouched.
I guess you could say, some work to be done to present jewelry through a perfect image that really sells. All scratches, defects, imperfections and reflections must be retouched using various photo-processing techniques. Note, however, that the final retouched result always must look realistic and natural, and certainly does not start to resemble a computer aided design.
Example 4: Retouching models
As a final example, we look at what you can retouch when it comes down to model photography. Here too, there is a wide range of techniques available to perfect everything according to the style that best suits your e-commerce story.
As always, consistency is extremely important to avoid a messy presentation. Once a certain style has been laid down for the presentation of your models, it is fully extended to the smallest details on every page of your store.
Let’s focus on two basic principles for the editing of model photography. Retouching the skin of the model and retouching the hair of the model. Look at the rather subtle before and after situation.

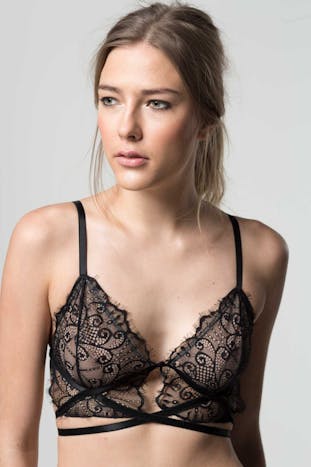
View the difference in detail by moving the slider from left to right several times, and pay special attention to the skin and hair.
First, we look at the skin. The rough skin and the skin tone were made smoother without losing the actual skin structure. The tired eyes and the bruises were retouched. Finally, you also see the birthmarks and freckles disappear and reappear when you move the slider from left to right. All realized with the help of small interventions, catalogued as model retouching.
After the skin, let’s look at the hair or hair style of the model. For example, if you want a complete natural look, you don’t (re)touch the hair at all. However, if you want to update the stray hair in a natural way and remove some subtle hairs, you can get started and retouch the photos according to strict specifications.
Note that the extent to which you want to retouch the skin and stray hairs can be perfectly captured with a strictly predetermined template. The template ensures that everything fits into a consistent e-commerce profile when it comes down to your model photography. Your store, so your style!
To conclude, with just a limited set of examples, we showed some options to make great images look amazing. Retouching photos is and remains a very broad concept, so remember, we only just touched the surface on how to retouch your photos because really everything is possible.