COO
Manual camera settings to shoot high quality product images
In this article, I will show you the manual settings on your camera. With knowledge of some basic principles such as shutter speed, ISO, exposure, white balance, aperture and focus, and a little bit of training, you will be able to produce high-quality product images that sell.
Shooting perfect product photos is not easy but practice makes perfect. I spoke with some do-it-yourself amateur photographers and repeatedly came to light that their camera was always in automatic mode. As a result, lost potential for the (expensive) camera and limited photo quality.
Therefore, again and again, the question of what settings should I use? How to shoot ideal product photos and can I learn this (fast)?
Fast is a relative concept, but you can learn it for sure and improve your skills and insight significantly with each new shoot. But before we start you obviously need more than a camera. Placing your products simply on the kitchen table is definitely not the way to go if you want professionalism. If you haven’t already, maybe start by reading up on how to set up your own photo studio and then continue reading this article.
Assuming your photo studio is set up, let’s go ahead, step by step. First, you’ll need a camera with the ability to configure the settings manually. Your smartphone or compact camera is fine if you
occasionally make a photo, but now we go for the real thing. So take your SLR at hand and let’s start. And no, it certainly does not have to be an expensive digital camera, a base model is just fine.
Let’s take a closer look at the manual settings
I’m not going to write instructions for a digital camera but I will give some pointers for basic settings such as file formats, shutter speed, ISO, exposure, white balance, aperture, and focus. After some practice, I’m sure the quality of your product photos will tremendously improve.
You will need a camera
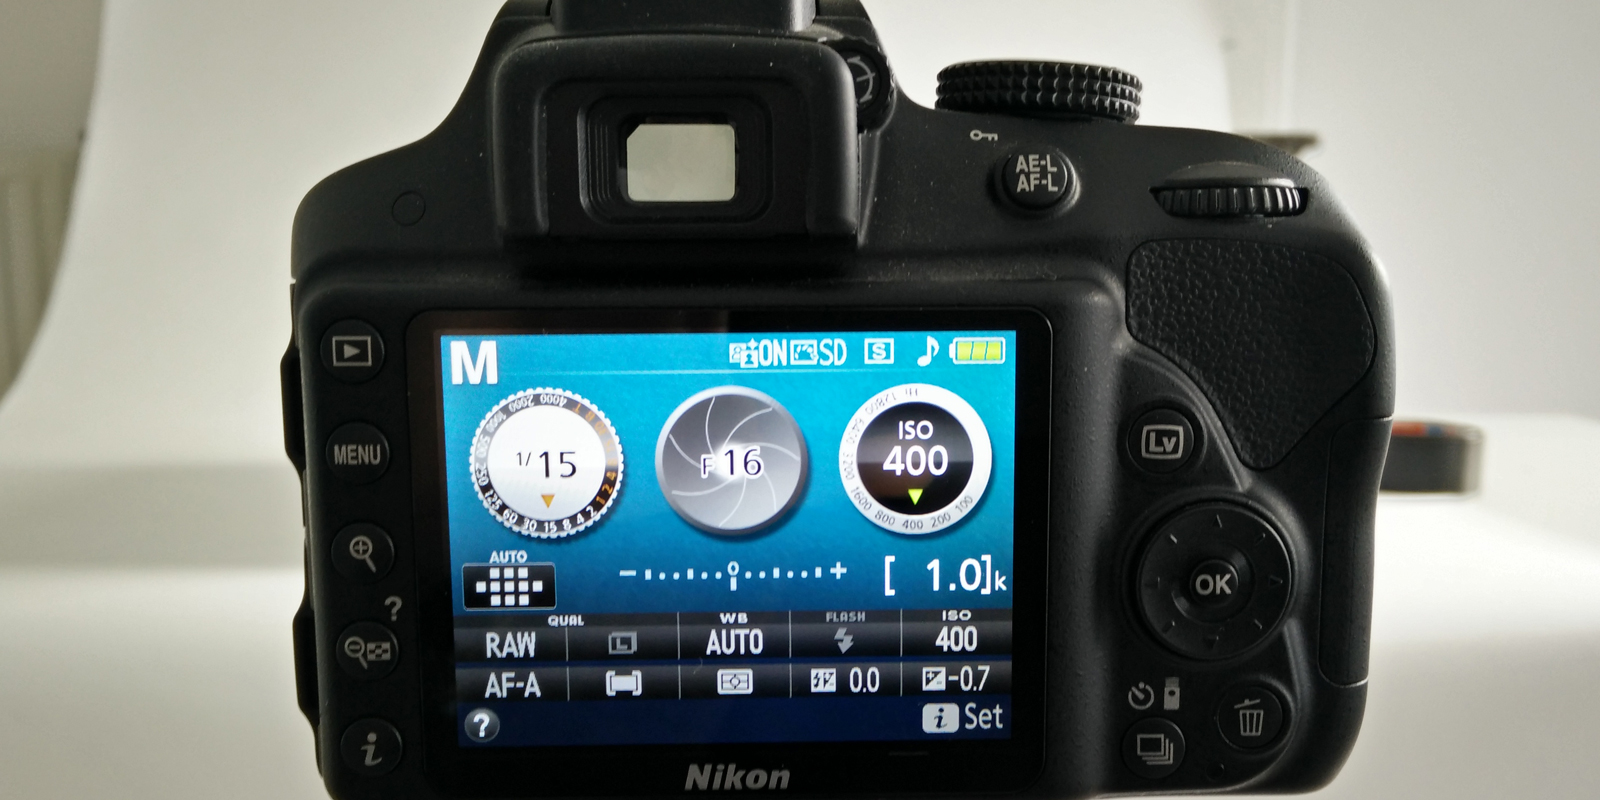
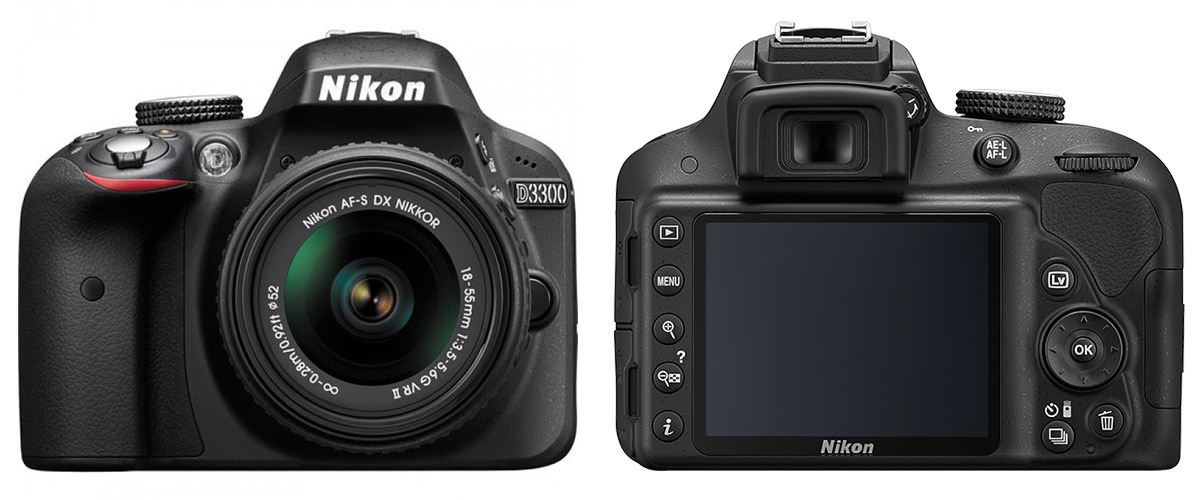
It doesn’t really matter what camera you’re using. Today, I will be using a Nikon D3300 but do not worry because all the settings described here can be found on any other digital camera.
Ready to start?
Your budget-friendly photo studio is setup? A table with a nice white background, your product, some reflective material, a camera, and of course a tripod. We’ll take it to step by step. Take your camera and let’s see what this thing actually can do for you.
Automatic or manual camera mode?
Easy or difficult photography? Limited quality product photos or professional product photos? All depend on whether you are going to shoot either manually or automatically. AUTO mode is very easy to use but difficult to understand without knowledge of the M (or manual) mode. In AUTO mode, everything is automatically set by your camera and the onboard software.
I want to shoot the perfect product photos under all circumstances so I need a basic understanding of the most important settings. This only succeeds with my camera in manual or semi-automatic mode, so let’s turn the knob onto manual.
Manual or semi-automatic camera mode?
I put my camera is in M mode, but I advise you to also shoot some test photos in each semiautomatic mode. The semi-automatic modes help you to take photos with a certain preset so that you can avoid certain settings and take it step by step.
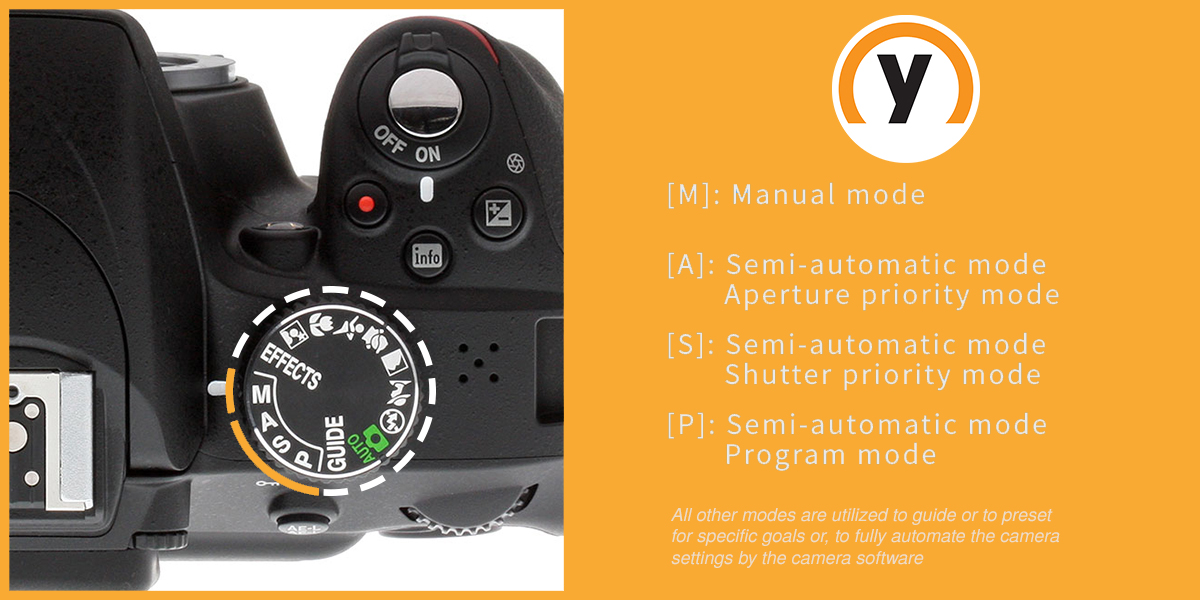
In the beginning, this can be confusing but look at it this way. You start in automatic mode and you need to adjust nothing. Then you have some semi-automatic modes in which you have to configure a certain amount of settings and others can be ignored. Finally, you have the manual mode where you have control over all settings of your camera. This is the mode that I can use to shoot perfect product photos, no matter what the surrounding conditions are.
And what about all those other camera modes?
There is much more to tell about all the different modes but these have no direct impact on product photography. If you still want to know everything about every mode your digital camera has onboard, read this article by Darren Rowse about Digital Camera Modes. It describes in a very clear manner every mode, categorized per icon as found on most digital cameras.
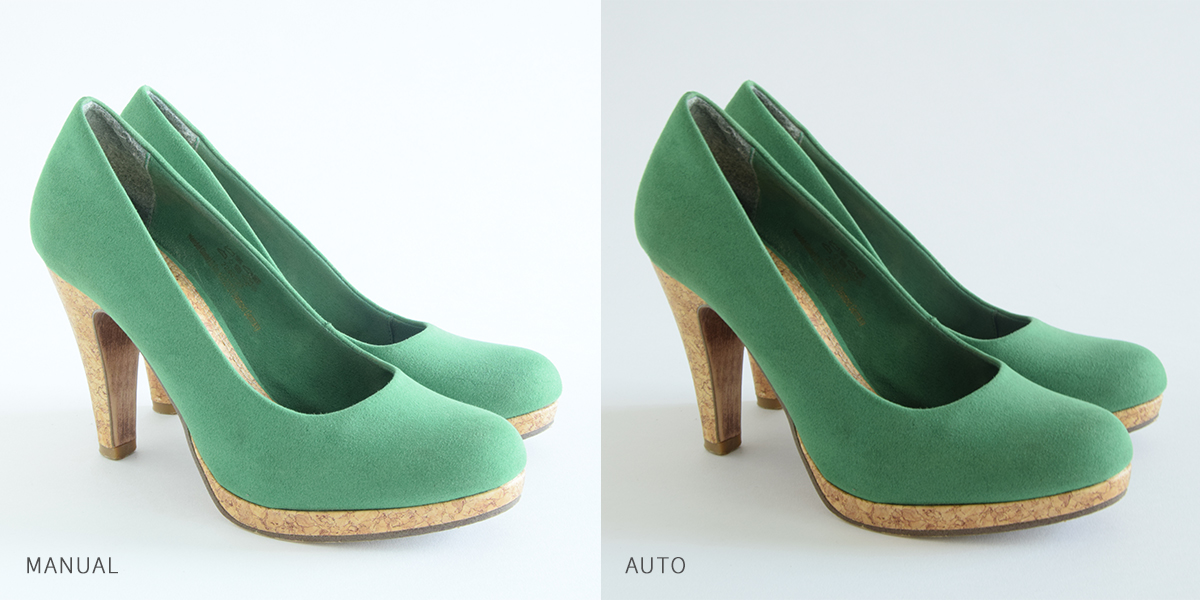
Automatic versus manual
Manual mode is our objective. Let’s shoot and show you the difference.
I’m not a professional photographer but at this point, no further explanation is needed I assume. So let’s take it step by step and give you the most important settings to get you in manual mode.
What file format do I choose?
We look at the manual mode because we strive for the best possible photo quality, and this is accompanied by a well-defined file format.

The well-known JPEG format is fine and particularly easy to use, but you are limited in flexibility in post-processing. If your camera allows it, choose to shoot your photos in RAW format. This is the original or unprocessed version of your photo where no form of compression is applied. The RAW files are heavier (more MB’s), but provide the opportunity for more fine-tune during the post-processing phase to improve certain properties of your images.
So, two steps are taken. My camera is in manual mode and I’m going to shoot/export RAW files so no digital information (or data) is lost before we even begin processing the photos. Ready to dig a little deeper into your camera settings?
ISO settings
Everywhere one finds standards and digital photography is no different. ISO in digital photography sets the standard or norm of the sensitivity of the image sensor. The ISO value is, strictly spoken, the sensitivity of the photosensor according to a certain scale.
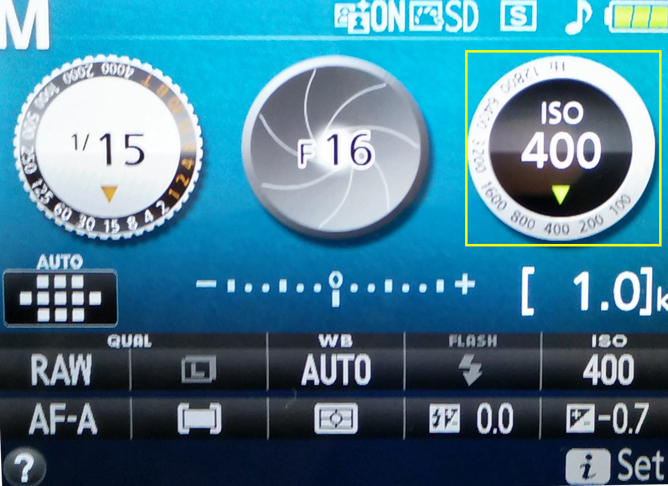
Higher ISO settings are generally used in darker conditions, from which you can infer that better lighting conditions require a lower ISO value or sensitivity.
I put myself to the test and shoot some photos with different ISO settings. I want some clarity so I’m going try out some more extreme ISO values. I start low and go higher and higher. We start at 400, go to 1200 and end up at 6400.
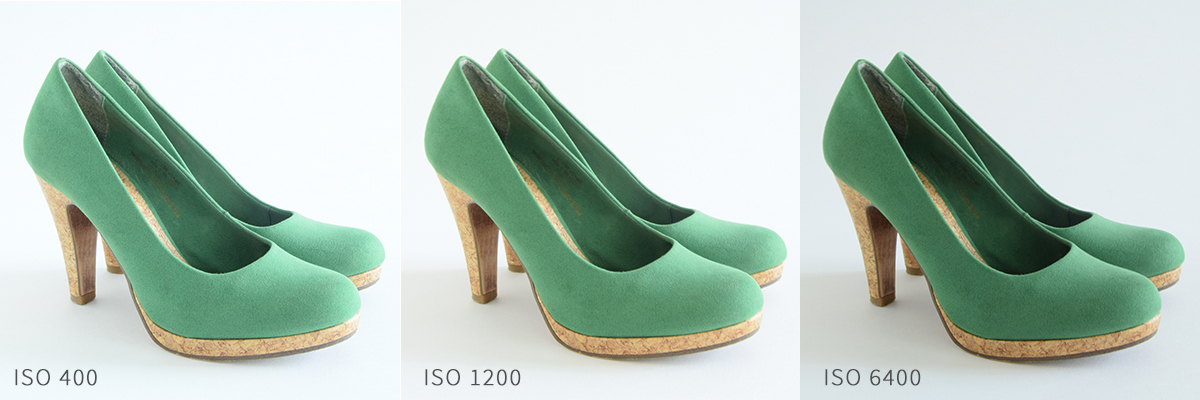
I see some difference in the background but what about my product? Am I doing better or worse? Which ISO value do we need to select and why this one?
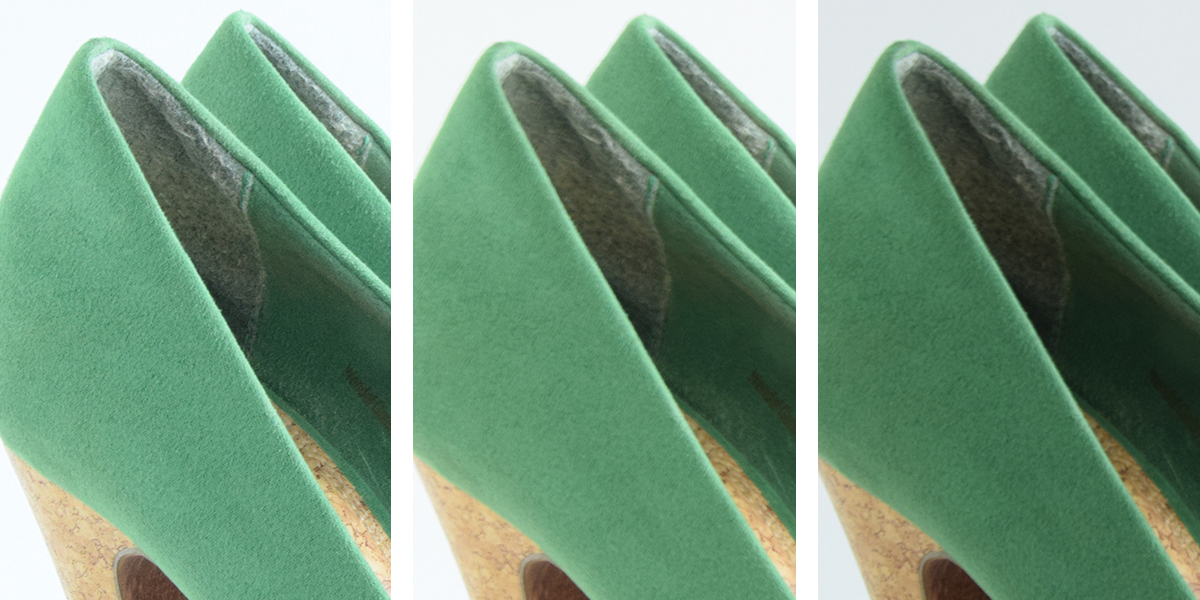
For this, we are going to inspect the result more in detail. I definitely get to see more noise for higher ISO values. We lose some sharpness and certain details are no longer visible as the ISO value increases.
Setting the white balance
I’m still using my self-built photo studio next to a window and I turned off all external light sources. Natural light (or sunlight) is still my only source of light in the room. If the sun is shining, no problem but avoid in any case direct sunlight hitting your setup.

Perfect to learn the manual camera settings, and you will save the cost of an expensive external light source setup. You even learn to deal with changing light conditions. A sunny day, a cloudy day, or even the time of the day, all have an impact on the settings of my camera. The light conditions change continuously but not to worry. My manual mode gives me control so that I can continue to shoot consistently perfect photos independently of the lighting conditions.
Setting the white balance ensures that my digital camera knows how the colors (or more precisely, the spectrum of colors) must be adjusted correctly so that the visualization of the product is as realistic as possible. Would you let the camera sensor and the onboard camera software decide on the lighting conditions, the automatic mode provides a solution.
When lighting conditions change constantly, change the white balance, and evaluate the results. By using only natural light the following settings will yield the best result: Cloudy, Daylight, or Auto.
Aperture settings
The aperture of your camera is usually a bit more difficult to understand, but knowing the basics will get you to master this setting faster than you might think. Simply put, the aperture is the area on which light is captured by the sensor.
Adjustment of the aperture is nothing more than resizing the area of light to be captured. If you choose a larger aperture, then you let more light on your camera sensor and conversely, a smaller aperture will allow less light on your camera sensor. Ok, but how to use this information for product photography? Bluntly, we can say that the exposure and focus are strongly influenced by the adjustment of the aperture and shutter speed.
It’s time to do some testing in my self-built photo studio, so let’s shoot some photos. The more test shots we take, the faster we see the effect and get an idea of what is happening. So now I’m looking for the correct aperture setting for the current light conditions in my photo studio.
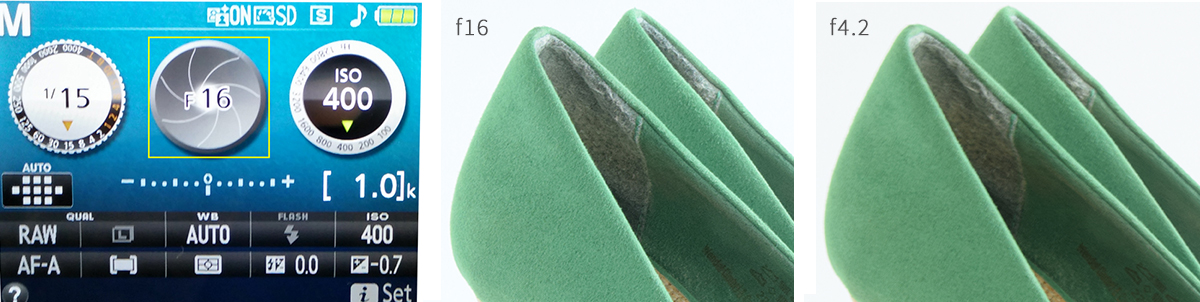
This creates some clarity. The aperture set to f16 is clearly much better than the aperture set to f4.2. Everything is sharper, certainly, the depth, and nothing is out of focus. Shoot some more photos and evaluate. A good rule of thumb is to set your aperture around f16, the vast majority of your product images are will be nice and sharp. If for some reason you cannot reach f16 try to go as high as possible or you could even try the auto setting.
Shutter speed or exposure time settings
Again one more step closer to high-quality product images. Don’t worry, we’re almost there. It’s time to set the shutter speed.
Shutter speed is actually not that difficult to understand. It’s simply a unit of time. More precise, it’s the time the shutter is open while taking a photo. And, time is actually time, expressed in fractions of seconds. For example, most cameras have a shutter speed of 1/2, 1/4, 1/8, 1/15 ranging up to 1/4000 seconds. The larger the denominator, the faster the shutter speed (the smaller the time frame).
A small example to clarify. Imagine you’re shooting a tennis match, you want to capture a stunning action shot. A slow shutter speed would be a major problem. Everything is in motion and the tennis ball is moving at a high velocity, resulting in a blurry image. How to get around this problem? Easy, capture the light hitting your camera sensor very fast by increasing the shutter speed, creating a sharper image.
Now back to business, product photography, we’re capturing a static object and definitely need a tripod. Why? The more stable your setup, the more you can decrease your shutter speed. The more you can decrease your shutter speed, the more light you will capture on your sensor.
Try to decrease the shutter speed as much as possible. The more stable the environment, the more time the sensor can be exposed to light to capture the photo without going blurry.
Remember, we’re dependent on sunlight, and lighting conditions are changing constantly. So our goal is to use the lowest possible shutter speed.
So best to set your aperture first and then to control your shutter speed, getting it as low as possible for the constantly changing light conditions.
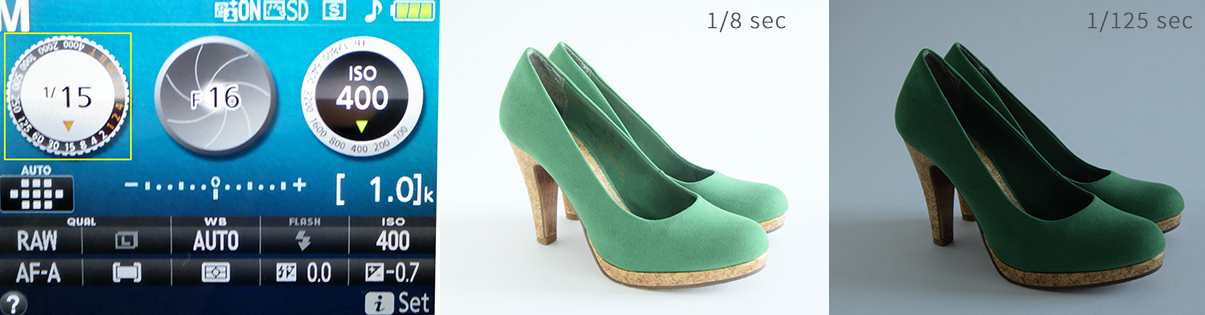
I make 2 shots with different shutter speeds: one with 1/8 and another with 1/125 seconds. Obviously, not enough light is captured when decreasing the shutter speed to 1/125 seconds.
Note that you can manipulate both aperture and shutter speed by adjusting the light meter (see below). In my opinion, try to set the aperture first, followed by the shutter speed, and finally optimizing both settings by controlling the light meter.
Light meter settings
I’ve talked about a semi-automatic mode in which only a subset of settings needs to be controlled manually. If you opt for automatic light meter settings you must switch to the A-mode or Aperture mode.
This aside, when letting your camera focus automatically on your product, the light meter will detect the amount of light falling on your product. Controlling the light meter will affect both aperture and shutter speed. I know, a bit confusing, but with enough practice, you’ll get the hang of it.
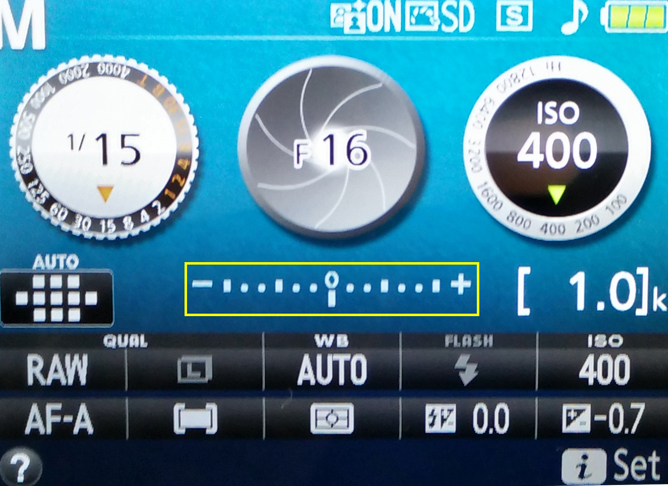
The question is when are my photos properly exposed? Easy, if the arrow is in the middle I’m good. Too far on the negative side will have a dark effect and too far to the positive side will overexpose my product image. Approaching the middle is ideal.
So keep on testing. Change the setting of your shutter speed or aperture and you’ll notice that you are totally in control.
Focus settings
Blurry images to put your products in the market? A very bad idea and proven in many studies. People are simply attracted to your product images and when they like what they see, then maybe they start reading and hopefully buying.
So the focus is clearly on the product photo. Ambiguous, yes. Both photo and customer should be in focus. Putting all the customers' focus on your product and your product images. Only then can you convince customers to buy your products.
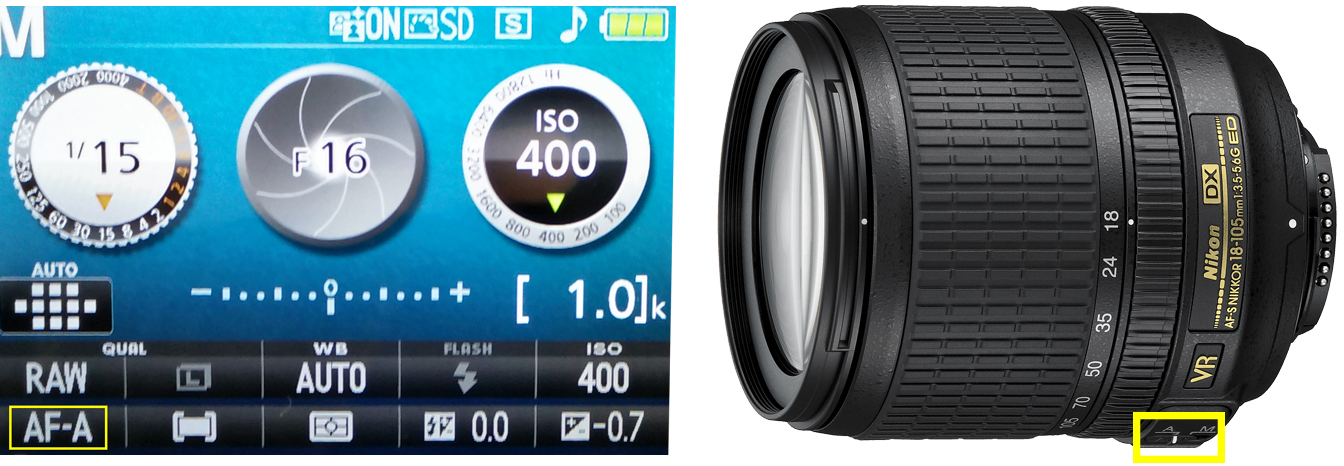
I have two options: manual or automatic focus. When shooting a lot of photos, and this is usually the case with product photography, then go for the auto-focus fatigue will strike soon as you’re going for manually focussing every photo. Additionally, you’ll have your hands free to play around with your setup.
Shooting photos & evaluating the results
We are ready to shoot high-quality product photos in manual mode. True, a lot of work but keep practicing. The more photos you shoot in manual mode, the better your understanding. Your learning curve will go up and at some point, you’ll be amazed by what you’ve achieved.
What to add to make the process go even smoother? Perhaps some tips to spend your time as efficiently as possible?
Here’s one, a direct or wireless connection to your computer so you can quickly assess your product photos. Ideally, a wireless connection via Wifi so at each step and each photo, you immediately see the results and do not lose unnecessary time by constantly switching between shooting and reviewing. Live images directly on your computer so that you progress with each new photo and each new setting.
So that’s it. Good luck with going into manual mode and shooting high-quality product images that sell!