CEO
Use these 6 important tips for good clothing photography
Before you start making clothing photos for your webshop, there are a few things that you will need to consider if you want a professional result. In this blog, we put you on the road with six basic but important tips for good clothing photography, after processing, ready for use in e-commerce!
The list can of course be extended far beyond these six basic tips but our goal is to avoid the most common pitfalls, rather than creating guidelines for professional photographers. So let’s get going.
TIP 1: Ensure proper preparation of your garment
Before you start shooting photos, good preparation of your garment is important. This preparation requires only a small effort but creates a world of difference in the end result. Both photography and post-processing will be a lot smoother, saving you time and money.
Simply removing the garment from the rack, laying it down, and start shooting is insufficient. After all, you want to convince customers to buy your products so pay attention to both the inside, the outside, and the shape of your garment before you start shooting.
Obvious, but in many cases forgotten, is the removal of all stickers, price labels, and other things that influence your final result. You can of course also remove everything during post-processing by retouching the images, but why this extra effort if you can avoid this with good preparation of your garment.
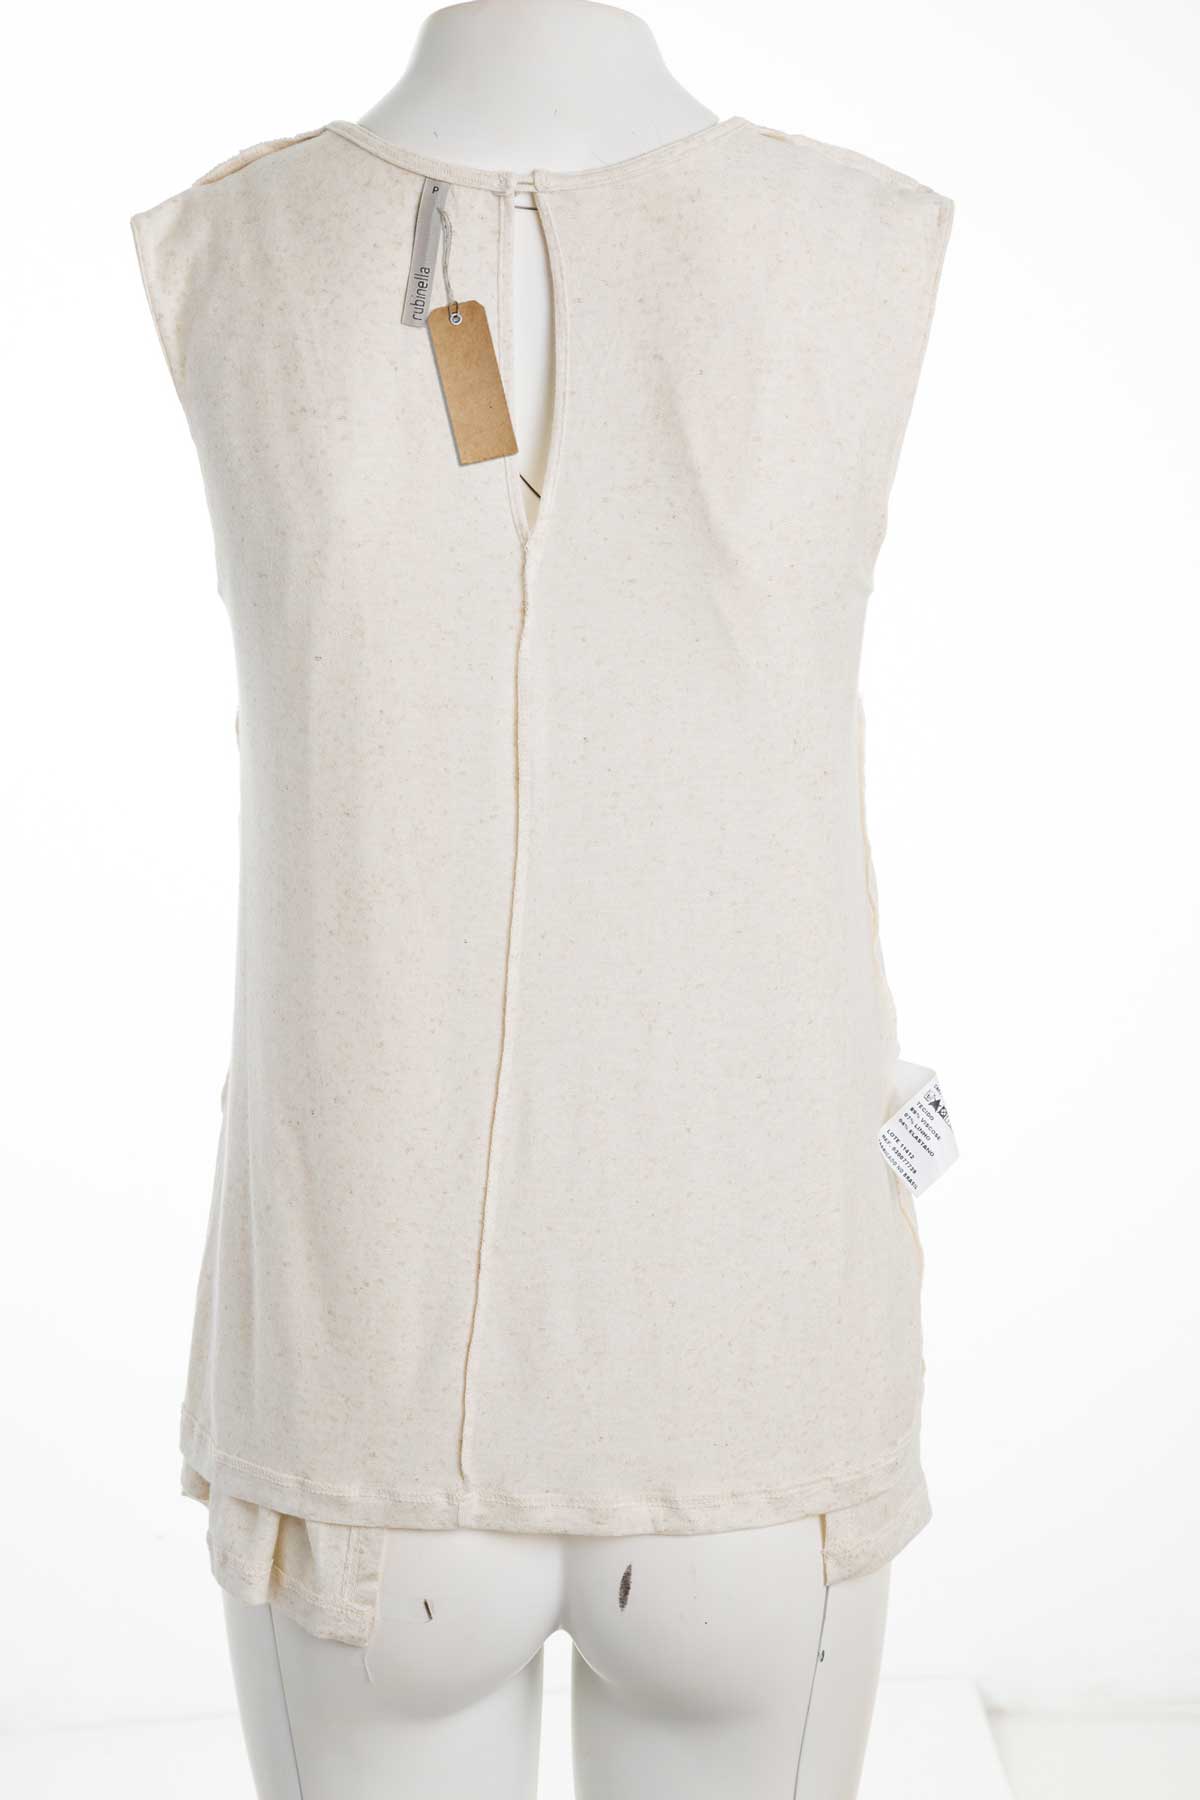
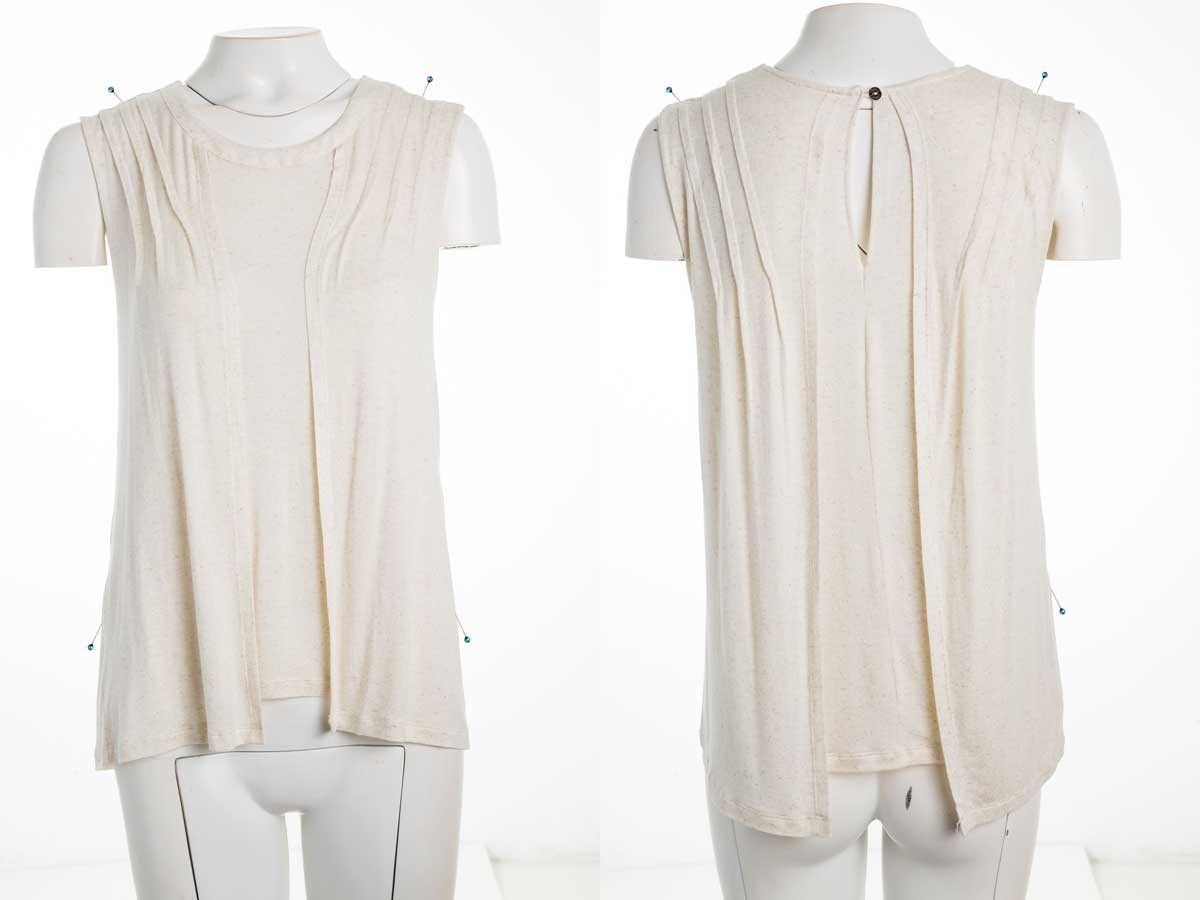
The goal is to present everything naturally, beautifully, cleanly, and above all attractive. Your preparation will help you with this. Smooth unnatural folds and shapes, and provide some symmetry when dressing your model or mannequin. The more natural the garment is applied, the more beautiful the result and the less post-processing is needed.
Tools such as needles, pins, and pegs can help you with this. The clothing will be restyled to give the correct shapes before photography starts. And don’t panic, these tools are easy to retouch, and the end result will always look much nicer than a sloppily dressed mannequin.
TIP 2: Use a mannequin or a model
Do you use a model or a mannequin to make your product photos? The difference between the two is mainly in the budget. Professional models are more expensive, and you only have a limited amount of time to take all your photos as the meter is running. If you use a static mannequin, you obviously avoid this problem. On top of that, you have more time to practice and to make certain photos again and again, in order to improve your skills as a photographer.
After taking the photos, you can work with Photoshop and apply “invisible mannequin” (also called “ghost mannequin”) photo editing techniques. The result, a realistic 3D shape for your clothing photos where the mannequin is completely removed.
In ideal circumstances, you take care of both. Photos of the clothing worn by a model and photos of the garment applied to a static mannequin and edited with invisible mannequin techniques. Together, these images provide the most extensive experience for your customers. The concept of “Less is more” when offering clothes through beautiful photos is certainly not applicable in the world of e-commerce. Who doesn’t want to drive customer conversion rate through the roof?
TIP 3: Provide sufficient light and a correct camera perspective
If you use a mannequin, a model, or both, your photos must ensure that you sell clothing. Two important basic aspects for taking a good photo are sufficient light and a correct camera perspective.
TIP 3.1: Ensure good lighting
Proper lighting of the garment is of course essential for product photography and certainly not less for clothing photography. A professional photographer therefore also uses many tools to achieve a perfect setup.
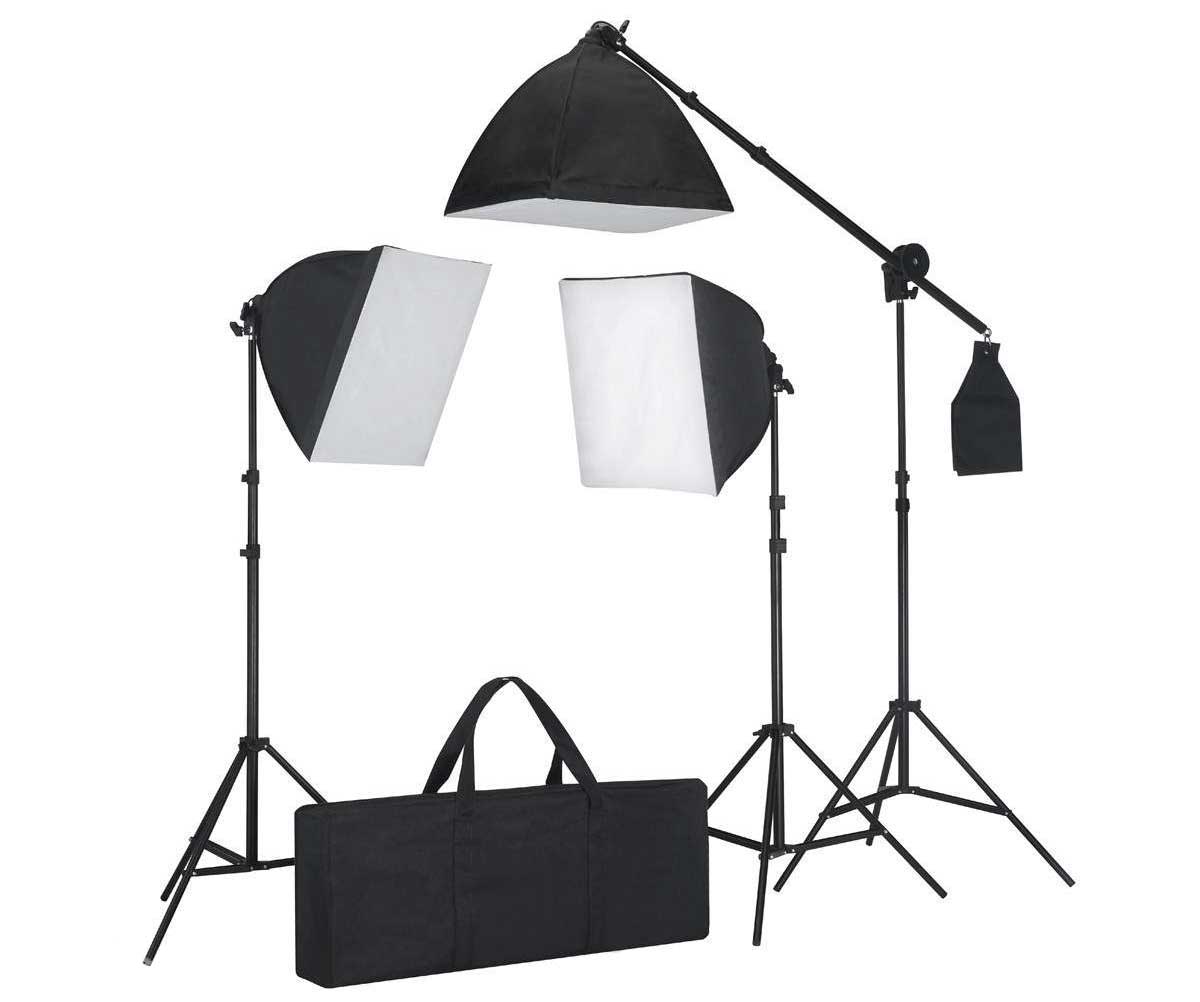
Obviously, not everyone is a professional photographer and a full-featured setup is a serious investment for an amateur photographer.
Not to worry, even with a more limited setup you will come a long way. And, as you shoot more and more images, you can always improve your setup step by step. For non-professionals, you start with natural light and as you get better, you scale and start investing in all kinds of tools, such as an external lighting kit and other cool stuff to step up your game.
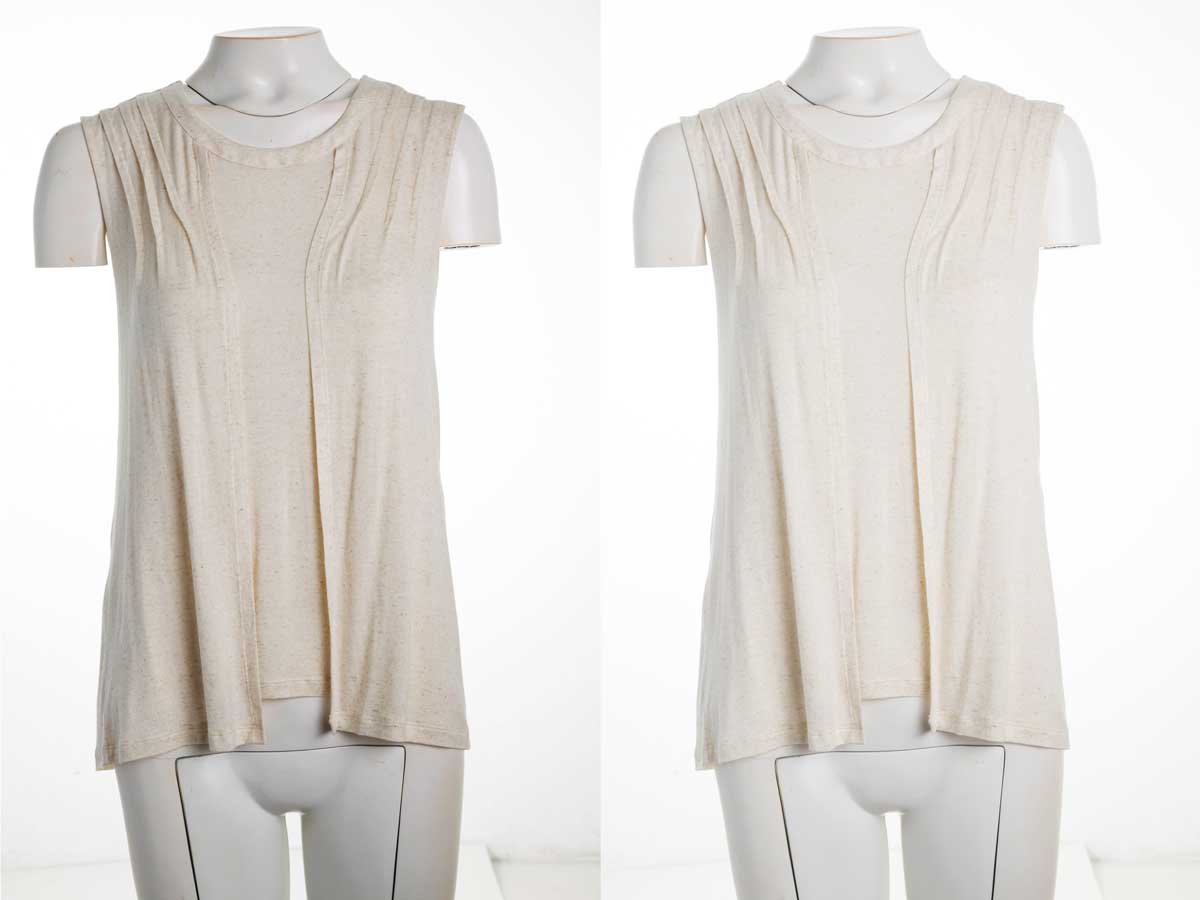
Below you can see the effect of different lighting with your camera in automatic mode. Left, without external lighting equipment and right with external lighting equipment. It quickly becomes clear that taking pictures without external lighting really puts your camera settings to the test.
Going forward without external lighting equipment? Read this article to build your own affordable photo studio with a limited budget. This way you can learn how to take beautiful photos without the use of an external lighting kit. You will learn lots of photography stuff very fast, especially about your exposure settings. Why? Simply because you will experience continuously changing light conditions because of your rather limited setup.
For the sake of fairness, you will have to exercise a lot more patience with the settings of your camera. You are in fact subject to the natural light at the location of your setup. Obliged to really get to know your camera settings before great product images will emerge from your commitment.
TIP 3.2: Correct camera perspective
From experience, we know that far too little attention is paid to a correct camera perspective. A detailed positioning of your camera in relation to your mannequin is extremely important for a perfect result.
As depicted above, the mannequin is somewhat out of balance. A small angle according to the vertical axis exists. You could think that this is the problem we are facing, but it’s not. The camera angle is perpendicular to the mannequin and does not pose any problem for the perspective. A simple rotation during the post-processing will solve this instantly.
Below you can see the real problem that occurs when the camera angle is not perpendicular to the mannequin. The green mannequin is positioned in the plane, but the red mannequins are not.
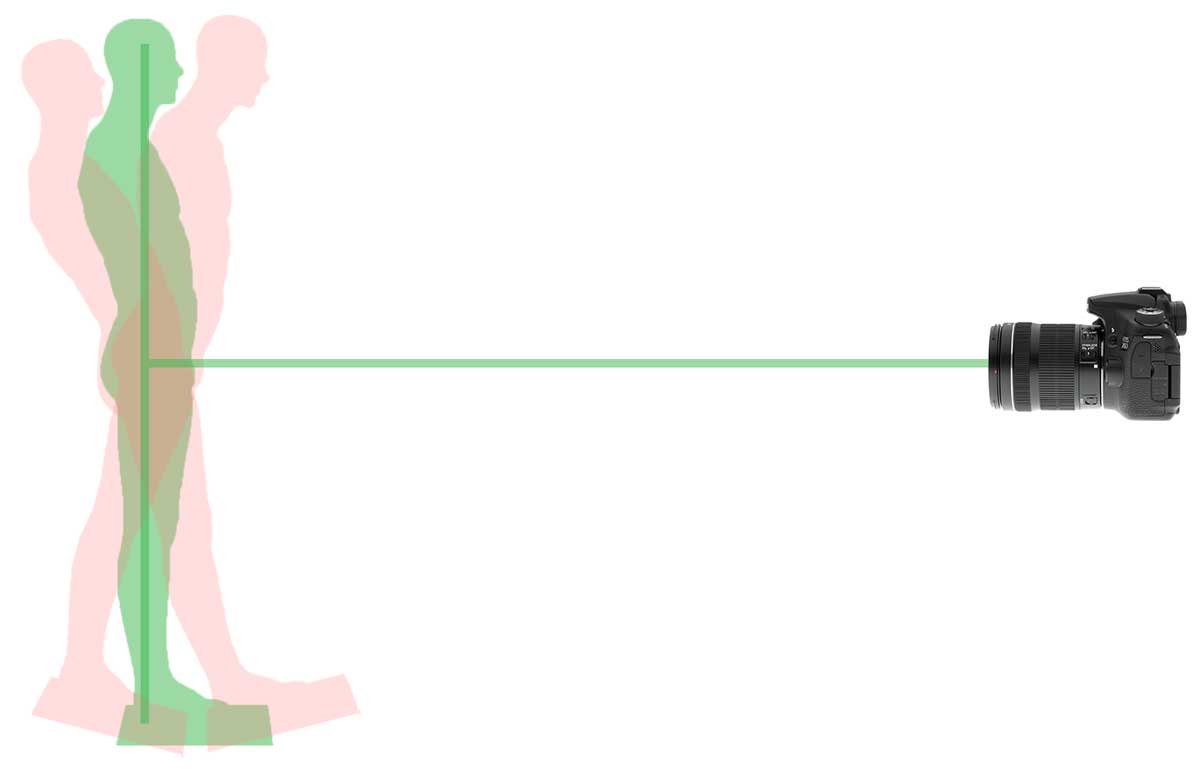
If the camera is also at the wrong angle, you will soon get the impression that the photo of the garment has been taken from an incorrect perspective. As if photographed from a frog or bird’s perspective. This has a lot of consequences for the post-processing of the images. A lot of extra effort with all kinds of required photo editing steps are now required to compensate for this wrong perspective. That is why it is highly recommended to take your photos perfectly frontal and avoid these wrong angles. A good solid tripod is certainly a must if you want a photo with a perfect perspective and thus reduce post-processing.
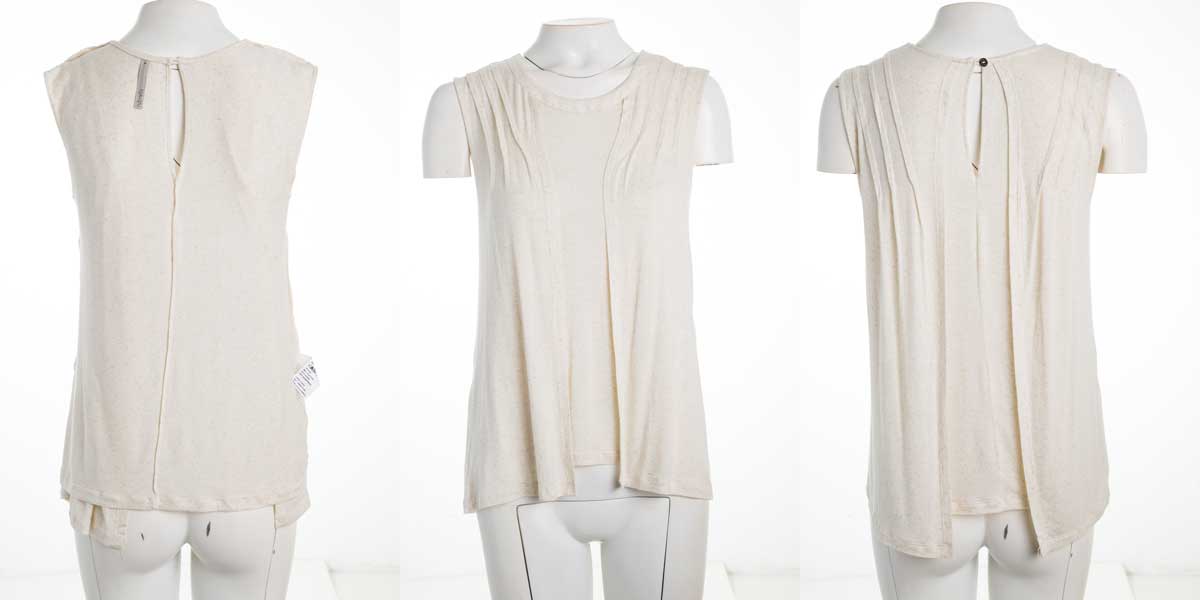
It is of course allowed and even recommended to rotate the mannequin around its vertical axis, as depicted below. That way you also consider the side and back of the garment so that more visual product information becomes available.
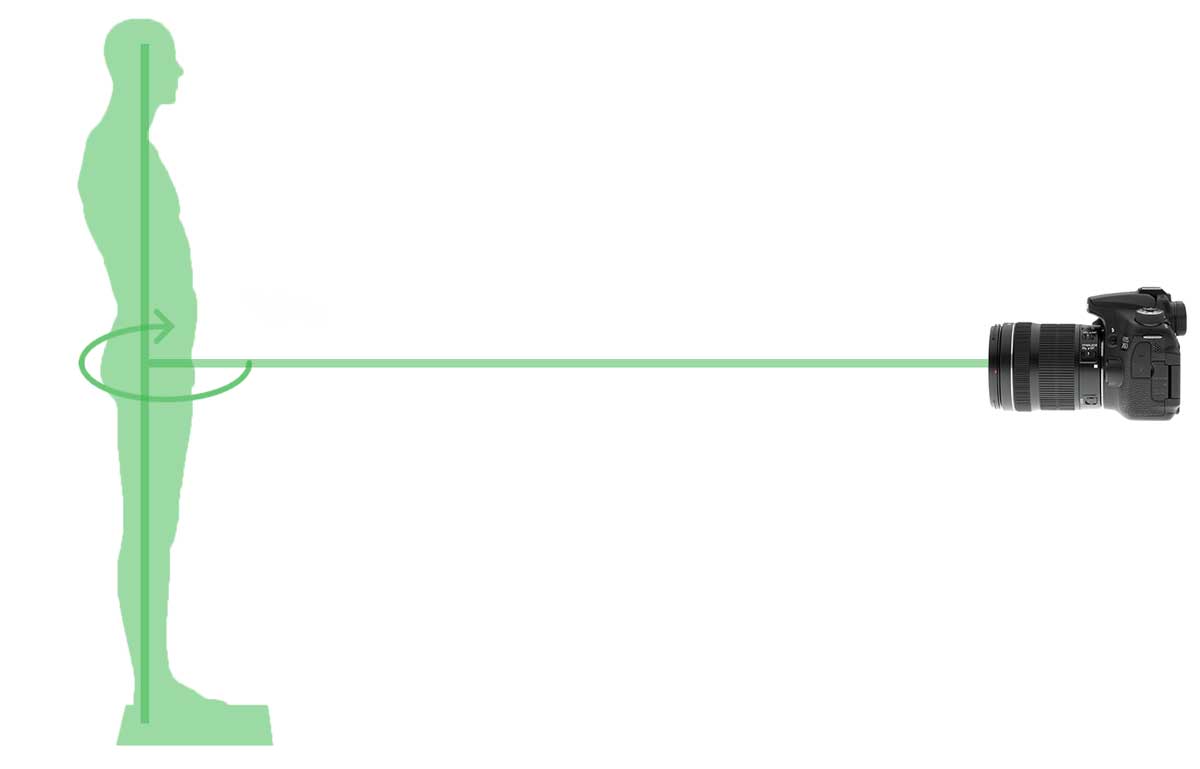
So long as the mannequin and the camera are perpendicular to each other, there is no problem whatsoever. It is even advisable to take several pictures of your clothing in this way. The camera always remains nicely in place and the correct perspective is always guaranteed because you rotate the mannequin only around its vertical axis.
TIP 4: Pay attention to your camera settings
From the previous tips, it became clear that you should pay sufficient attention to your camera settings. Of course, you want everything more professional. Regrettably, neglecting your camera settings is not an option.
If you are a starting photographer with ambition, we advise you to invest in a basic DSLR (Digital Single Lens Reflex) camera and a suitable lens for product photography. Then you have the choice to make your photos in automatic mode or in manual mode. This last one is the only real option if you want to go up the learning curve and want to improve your photographing skills. You learn to take photos under different lighting conditions and initially avoid an expensive studio setup.
In manual mode, several settings can of course be configured. Starters sometimes get lost between all those buttons and settings. Therefore, start by reading this article about how to handle the main manual settings of your camera for product photography. You will notice that you have mastered the settings faster than expected.
In short, the following settings are discussed: ISO, white balance, aperture, shutter speed, light metering, and focus. Once you have mastered these settings, you will be ready to professionalize. We are firmly convinced that by practicing and always critically evaluating your photos, you will soon exceed the amateur level.
Better yet, you gain more and more knowledge about your hardware and in the meanwhile, you always improve your studio setup. You start using things such as a lighting kit, reflection panels, and a gray card.
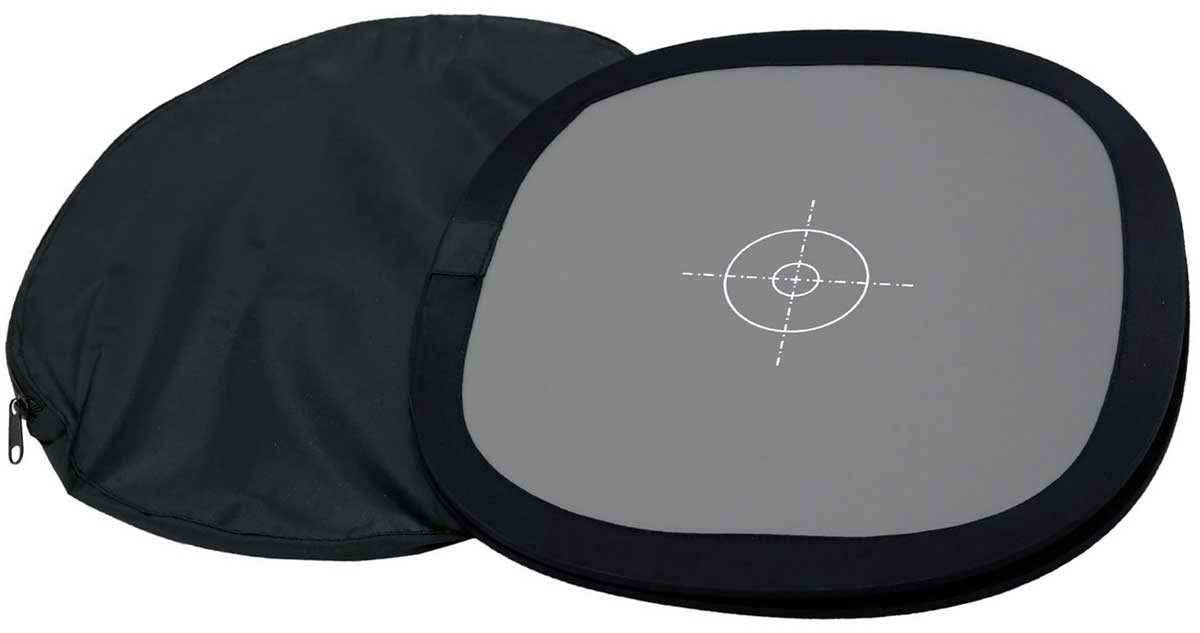
You calibrate the perfect white balance and in the end, you are amazed by the photos you produce yourself. Then you get to work in Lightroom and even in Photoshop and before you know it, you may even dare to call yourself a professional photographer.
TIP 5: Take plenty of pictures of the garment
The more good photos the better is certainly the case when it comes down to e-commerce. Online customers become more critical by the day. It requires a lot of convincing to let your customers make a purchase. You want to remove all doubts when your potential customers land on your pages. Marketing has done its best, it is now time for conversion.
If you only present the front of your garment, customers will wonder what the back of your garment looks like and doubt arises. Customers simply want more visual information when they shop online for a new outfit.
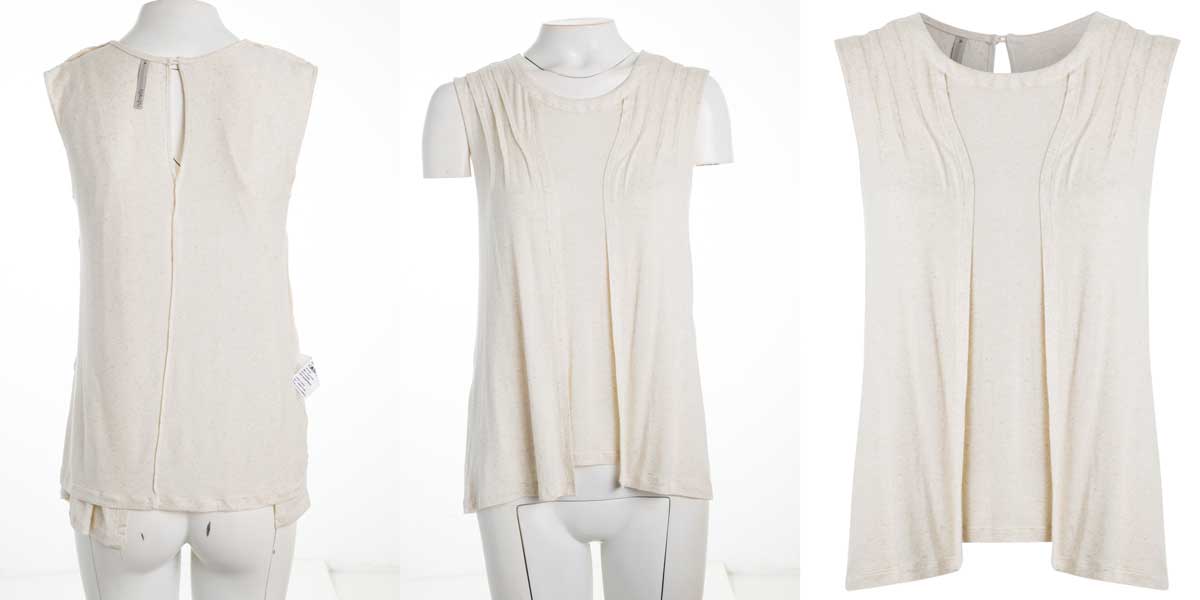
At least two photos but the more beautiful photos and accompanying views, the more you will convince and especially sell!
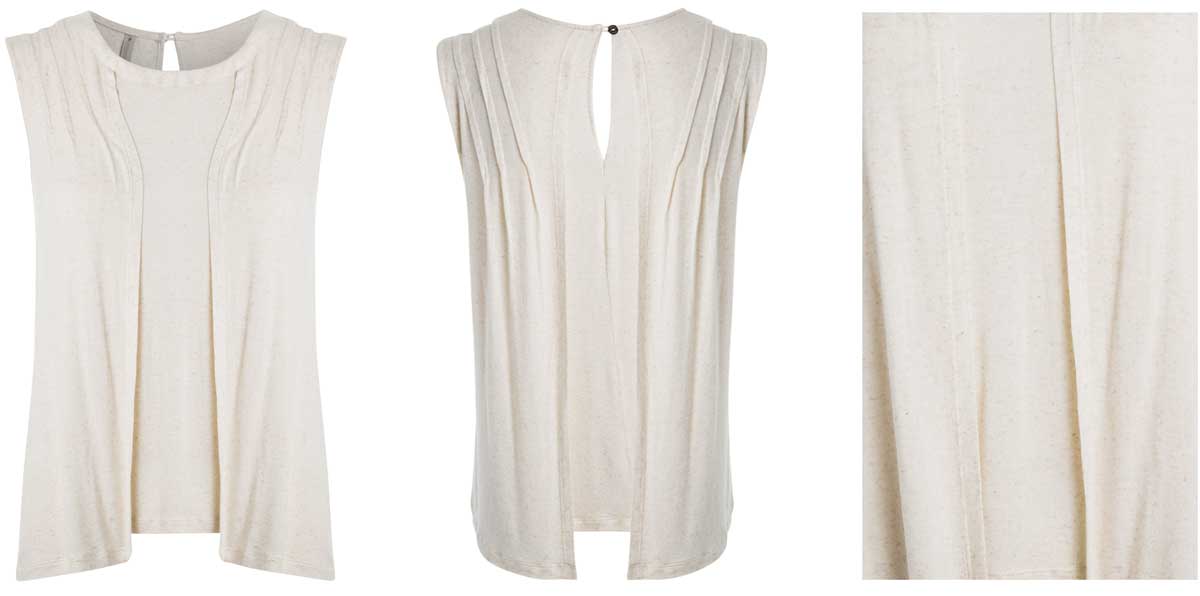
Therefore, photograph your garment completely around by rotating the mannequin. Make the inside visual, and photograph the structure of the fabric by deeply zooming in on the garment. You can also show a specific outfit where other matching garments are worn by one or more models.
TIP 6: Ensure the perfect post-processing of clothing photography
Is the post-processing of clothing photos or simply product photos necessary and which steps you really cannot skip?
Rest assured, no respecting online clothing store will publish its clothing photos online immediately after shooting unless the company in question likes to waste a lot of marketing budget.
But which photo editing steps are really necessary? Starting with the basics, before the real post-processing starts, two phases can be distinguished. After shooting, the entire batch is processed in Lightroom and the perfect white balance is set mostly via “batch processing”. As an alternative to this first phase, you can integrate the white balance calibration with the camera settings during shooting and then also transfer to Lightroom. Additionally, these two basic steps can be combined to pursue true perfection. Subsequently, the second phase starts, the real post-processing of the images. Ready to Photoshop?
TIP 6.1: Photo alignment, margin, and size
Nothing is more disturbing than photos of a clothing collection with an inconsistent alignment, margin, or size. Not only the overview pages are very disturbing and messy, but the detail pages also provide little confidence for your customers.
Of course, there are countless types of alignments, margins, and dimensions for all types of clothing and accessory photos. Think, for example, of alignments according to shoulder height, shoulder width, hip height, hip width, centered vertically, and so on.
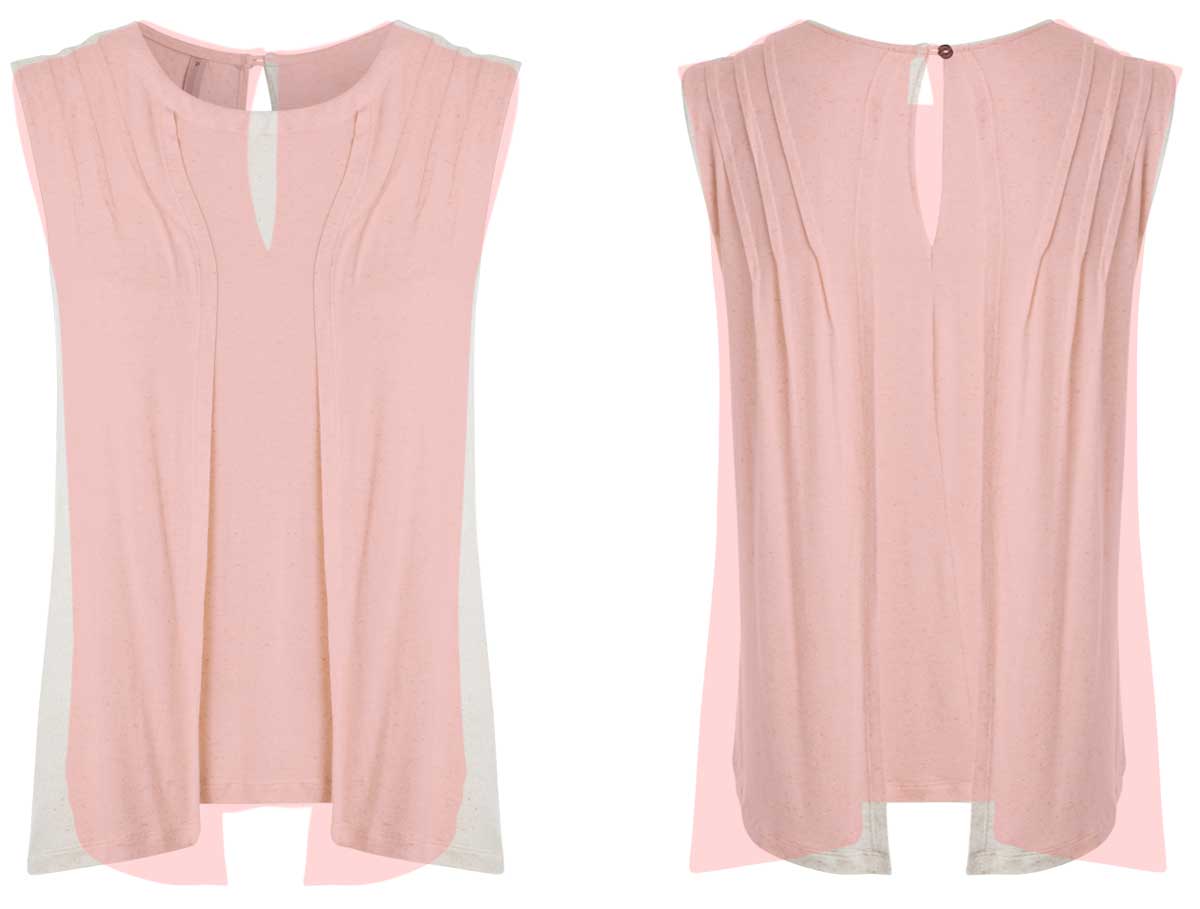
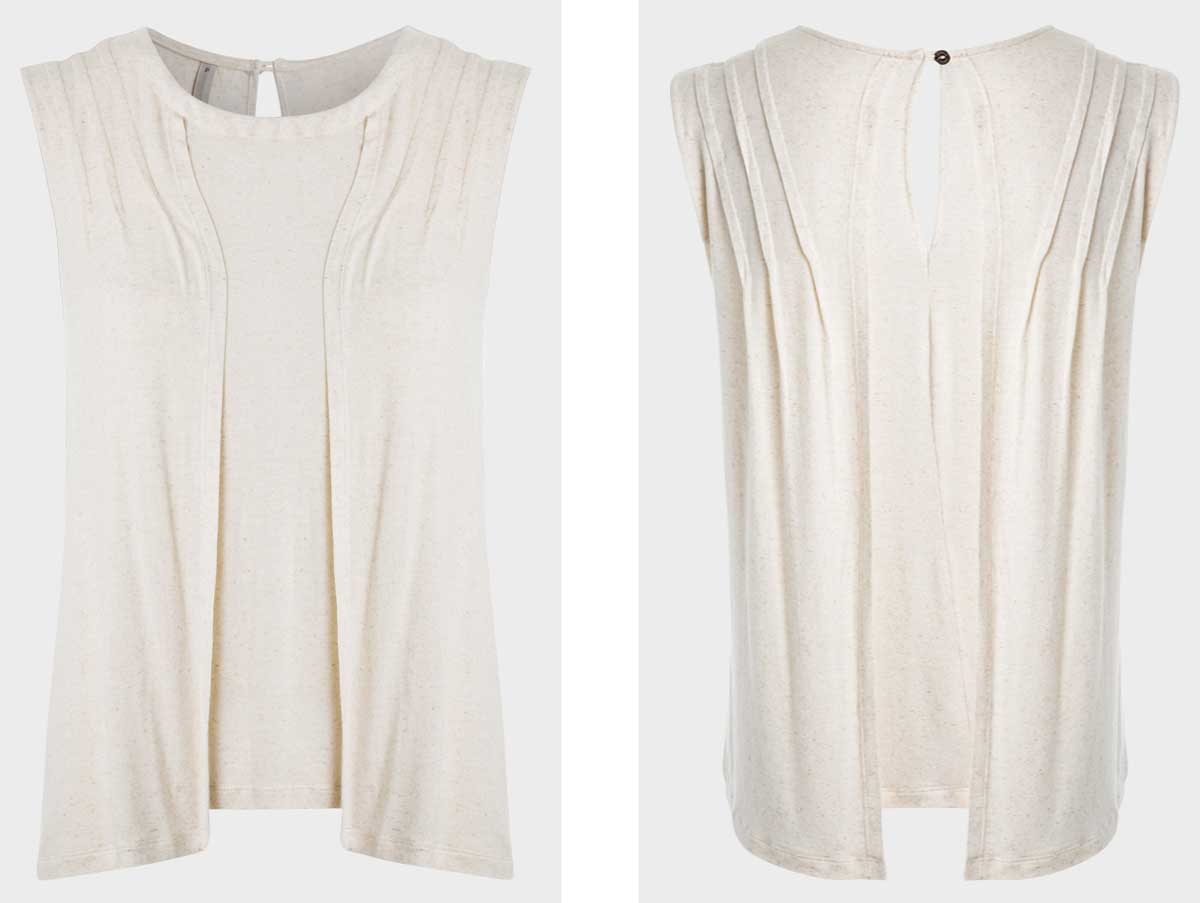
Below you can see an example of how the front and back of the garment are perfectly aligned, considering the shoulders, the neck, and the height of the garment. This way everything is displayed perfectly, just as your customer likes.
In addition to basic clothing, accessories such as handbags are also items that need extra attention when it comes down to the alignment, margin, and size. Same accessories but different sizes? Aligned on the bottom surface or centered but in any case, everything with a correct ratio so that your customers immediately sees the difference between the large and the small model.
Another common problem experienced as very disturbing is the same garments in different colors that are not perfectly aligned. When no extra attention is paid to the alignment, margin, and size, these garments all seem different, while only the product’s color is different. And yes, very disturbing for your customers, which means they quickly drop out.
How do you realize all this for all these different items of clothing and accessories in your webshop? Simple, for every product group such as pants, skirts, shirts, or dresses, a specific Photoshop template is created. Once created, this template ensures the consistency that every webshop needs to present everything nice and clear.
TIP 6.2: Remove photo background and select a consistent color
Not all webshops opt for a white background, but that does not mean that the background of the photos should not be removed to create consistency. Usually white, sometimes light gray, and exceptionally different colors. Each time the product, or in this case the garment, is first detached from its background (= photo background is removed) and then placed against the new and consistent background. In the end, this and all other image editing steps, yield a nice overview, and avoids a messy presentation of your clothing collection.
TIP 6.3: sRGB as color model
After photographing and selecting a consistent template, we are finally ready to publish the clothing photos. We only must ask ourselves how our photos are presented on all possible screens and internet browsers? Can I guarantee my color quality at all times? More specifically, which color model should I choose to display the photos as well as possible in an e-commerce environment?
Some of the different color models available are CMYK, RGB, and sRGB. All three with certain advantages and disadvantages, so which one should I choose when I have the publication for e-commerce in mind?
Let’s skip the CMYK color model for a moment and focus on the RGB family. The RGB color model set the standard for most cameras, provides a wider spectrum, and is therefore ideal for photography and the associated post-processing without loss of quality. The sRGB color model includes a more limited color spectrum and therefore the following question. Why not always use the RGB color model for every publication? For print (you could also use CMYK but let’s not overcomplicate things) or when no loss may occur, this is indeed the right choice, but with e-commerce in mind, we prefer to play it safe. Simply stated, we limit the spectrum and guarantee reasonable good color-accuracy on all screens and all internet browsers by using the sRGB color model instead of the RGB color model. Why? Because the sRGB color model is the most commonly used color model found on computer apps and internet browsers nowadays.
Finally, you may notice that you could have already set up the sRGB color model with your camera during shooting. Realize, however, that there is no way back. That is why we strongly recommend that you select the sRGB model only during the final export of your photos and that you do not limit the photo quality and post-processing by setting up your camera with the sRGB model during shooting. The final adjustment in Photoshop, however, provides the guarantee of perfect color presentation with e-commerce in mind, during the transformation from RGB to sRGB.
Conclusion: tips for good clothing photography
Customers land on your pages because of a certain active marketing budget. Unfortunately, these customers leave your webshop quickly when you do not pay sufficient attention to your photography and post-processing. Because clothing is widely represented on the internet and the competition is constantly rising, we have brought together the most common pitfalls in the form of basic tips. Some minor changes in both clothing photography and post-processing create a world of difference for your webshop, resulting in satisfied customers and no wasted marketing budget.
Fashion images are dedicated to showing clothing and other fashion items in the best possible terms. It uses deeply ingrained human psychology to create an interest in and a desire for a product. Here are other useful resources on fashion photography to read.